If you see some odd things here, it's 'cause I haven't a clue how to do a blog. I actually deleted my old blog 'cause .... well .... I didn't like it. Frankly...it sucked! So here I am ... giving it another try. Why? ... 'Cause it was fun! Sucky as it was I still had a blast doing it!
I have a lot to learn .... about blogging, I mean. It's a bit intimidating to me 'cause it's kind of like public speaking ... which I was NEVER any good at. (In high school I took a '0' on an assignment rather than get up in front of the class. Yeah, sad.) And then it hit me! It's not like10 million people are gonna read this (or even 10 people) so what's the big deal? The big deal is .... someone MIGHT read it. There's always that chance, slim or not. (This is the internet, after all).
Well, boohoo for me, I say. Suck it up and try not to suck ... too much.
Reading, Crafting, Sewing, Cooking (well... eating, actually, but that didn't sound right). These are the things that have always made me happy (next to family and friends), and that's what you'll see here. What makes you happy? UPDATE: Since joining the A to Z Challenge, I have no idea what my blog theme is. Please bare with me while I figure it out. I'm learning so much from this. :)
Wednesday, 28 March 2012
Clock Makeover
 |
| Clock Makeover |
Here is a quick tutorial on the basic steps. Note: Sorry, I don't have a before picture.
Materials:
Clock, Fabric, "Numbers", Cardboard,
Spray Adhesive (use in a well ventilated area. I was running out to the garage each time I needed to use it ... which is a good thing .... I needed the exercise)
1. Pop off the clear plastic cover (if yours has one), pull off the hands (I'm not sure if all clocks have pull off hands, so be careful) and remove the workings from the back. The face (cardboard with the numbers on it) should come right off, mine fell off as soon as I took off the hands.
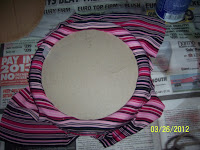
2. Place the fabric face down and apply spray adhesive. Place the cardboard face plate on top and rub all around so it adheres well. I would recommend placing the face plate number side up and not blank side up as I did here. If your fabric is light, the numbers will show through. I mistakenly placed mine number side down. Oops!
3. Cut around the face plate. Cut out the hole in the centre. The stem for the hands pushes through here so there can be no fabric pushing up as it may impede the movement of the hands.
Note: At this point, if you aren't planning to cover the frame of the clock, you can skip ahead to Step 9.
4. The frame: Lay the fabric on the clock frame. Cut 2 pieces of cardboard about the size of the face plate. Fit one into the frame on top of the fabric. The other will be used in Step 5. The idea here is to help hold the fabric in place when it's time to roll it out over the frame (once the adhesive is applied).
5. Fold the fabric over the cardboard and place second piece of cardboard on top. This will protect the fabric while the adhesive is being applied.
6. Spray the adhesive all over the clock frame.
7. Remove the top cardboard, unfold the fabric and roll it over the frame, rubbing everywhere to minimize the wrinkles. (Keep the first piece of cardboard for now as it is still needed to anchor the fabric.)
 |
8. Remove the first cardboard piece and cut out the fabric covering the middle of the clock. This part will be hidden by the clock face and you don't want to add any thickness here since the stem height for the hands will allow for very little added thickness.
9. Now for the fun part! Reassembly! Fit the face plate into the clock. Reattach the workings through the back and push the hands back on at the front. Be sure they are seated correctly or they won't work properly.
10. Once the hands are in place you can begin gluing on the "numbers". I used hot glue and buttons here.
11. Start the "numbering" by bringing the minute and hour hands to the 12:00 position using the dial at the back of the clock. Place your first "number". Then spin the minute hand around to the 1:00 position and place the second number, and so on.
Replace the plastic cover, if desired and you're done!

Here is a clock where the frame was kept and only the face plate and "numbers" were
Happy "clocking". :)
Subscribe to:
Comments (Atom)


